Last Updated: June 6, 2025
Are you having trouble with a UPC and need to change it on Amazon? This step-by-step guide will walk you through exactly how to change UPC code on Amazon the right way.
A UPC is a unique identifier that connects your product to Amazon’s catalog, so it’s critical to get it from a trusted source like GS1. But there are situations where you may need to update or replace your UPC, and Amazon doesn’t make it easy.
While it is possible to change a UPC, the process can be difficult and frustrating due to inconsistent policies and potential listing errors. Because of that, many sellers avoid it altogether, even when it’s hurting their Amazon listings and sales.
This guide was made to simplify the mess and help you take action. Our Amazon agency will walk you through how to update your UPCs, what to do if Amazon rejects your change, and share tips to improve your chances of getting approved.
Table of Contents
Can You Change UPC Codes on Amazon?
Changing UPC codes on Amazon is possible, but often complicated due to strict platform rules. Sellers must carefully follow Amazon’s policies to avoid issues like listing suppression or ASIN errors.
Yes, you can change a UPC code on Amazon, but it’s rarely an easy fix. Even though there are valid reasons for making the change, doing so can trigger more problems if you don’t follow Amazon’s strict policies.
Amazon treats UPCs as permanent identifiers that tie products to their catalog data. Any change request will face close scrutiny, and if done improperly, it could result in listing suppression, ASIN mismatches, or even account warnings.
How to Change UPC Codes on Amazon
Sellers have multiple options to change UPC codes on Amazon, depending on their specific situation and account permissions. Below, you’ll find proven methods and detailed steps to update your UPC correctly and avoid listing issues.
Method 1: Directly Change UPC on Amazon Seller Central
If you entered the wrong UPC when creating your listing, you might be able to fix it directly from Seller Central, no extra work needed. This method is the fastest way to update a UPC if Amazon allows it; here’s how to do it:
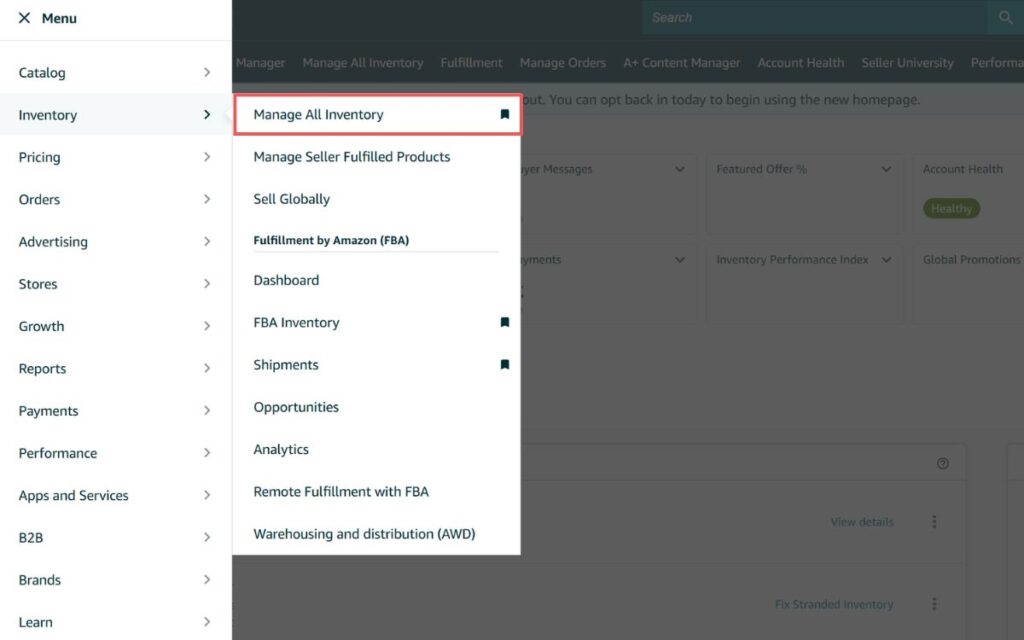
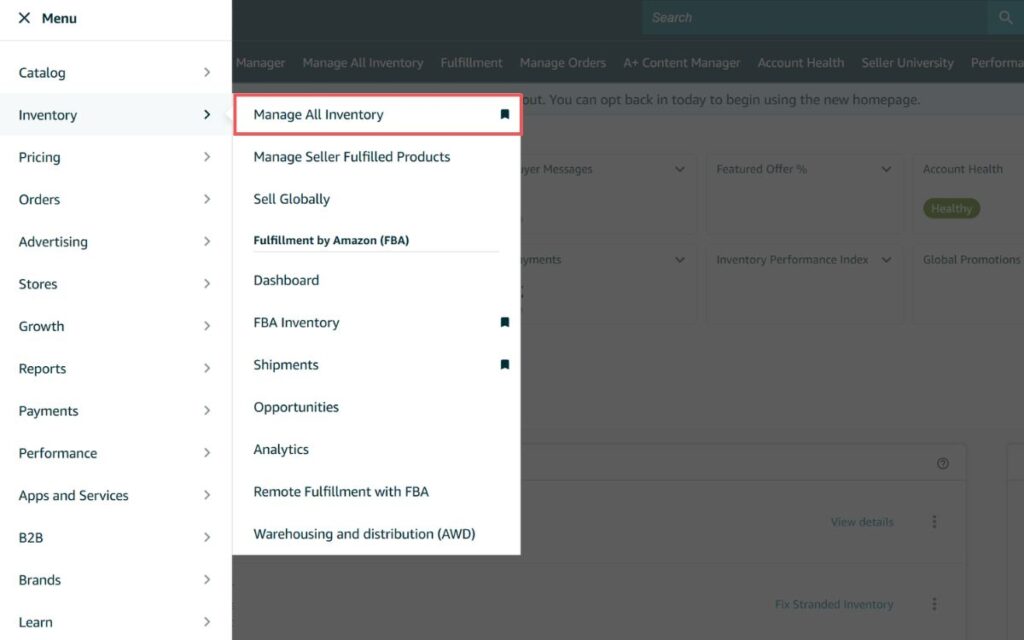
Step 1: Log in to your Amazon Seller Central account and go to “Manage All Inventory”.
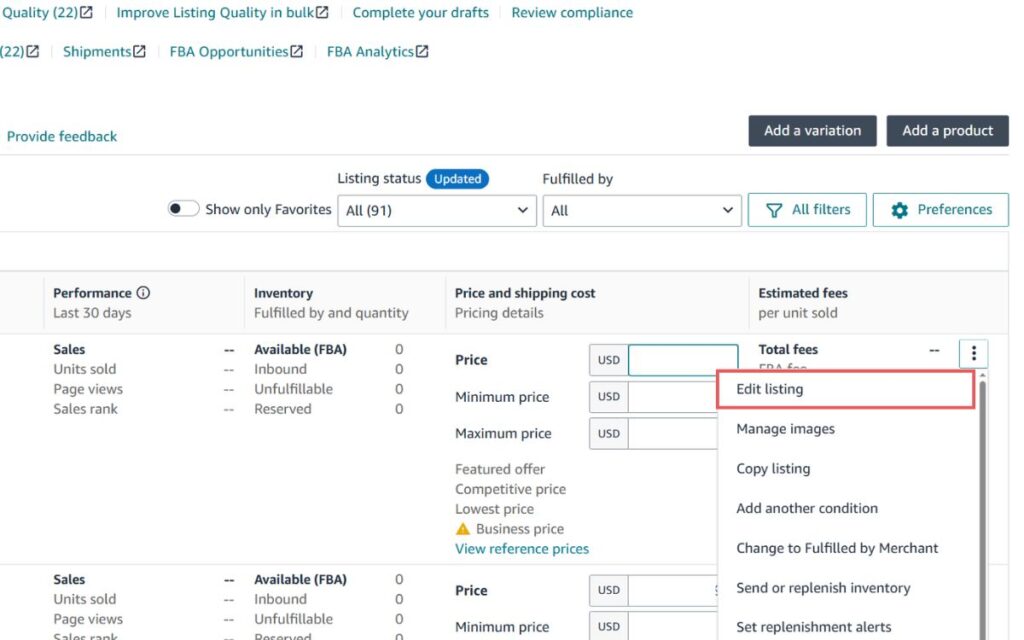
Step 2: Find the product you want to edit and click “Edit Listing”.
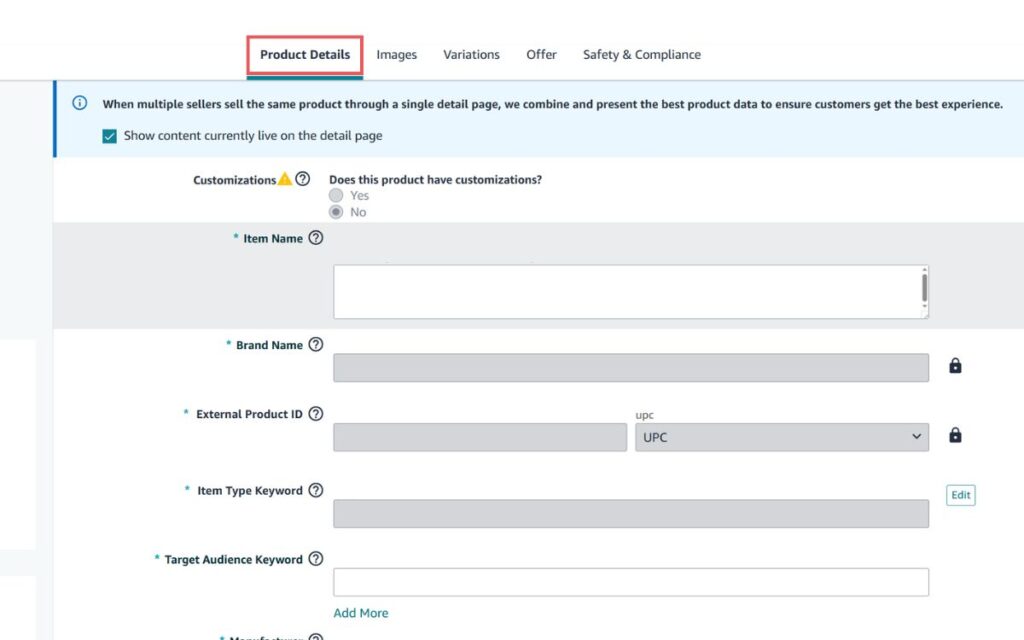
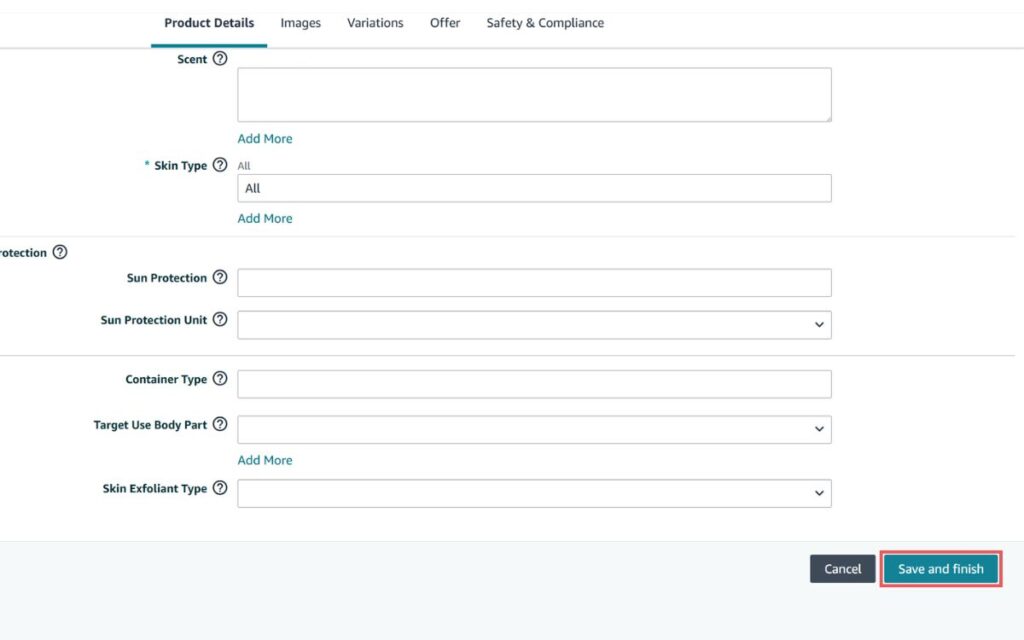
Step 3: Navigate to the “Product Details” tab.
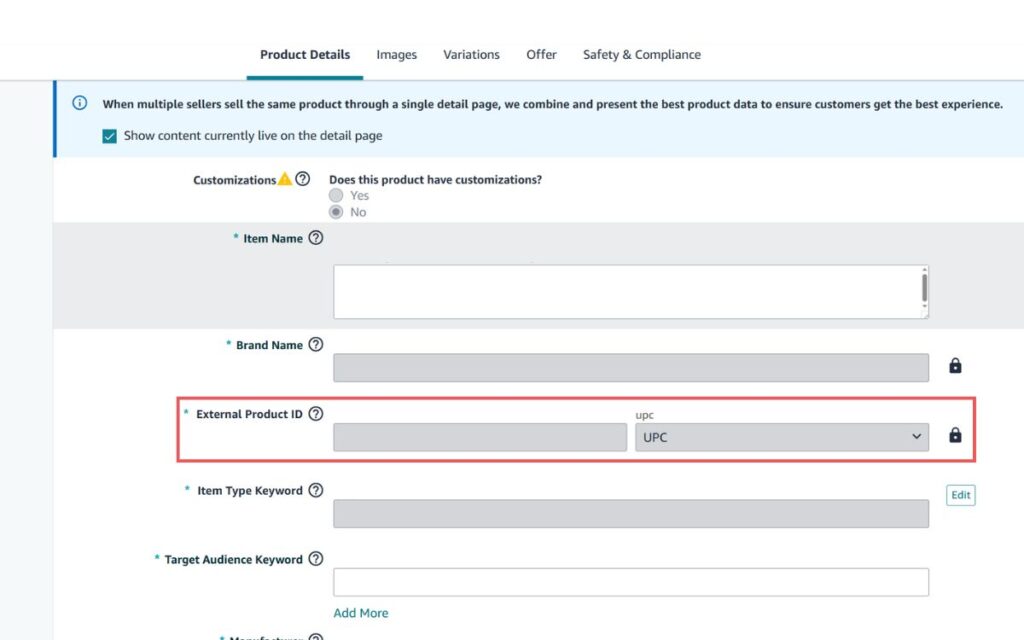
Step 4: Locate the “External Product ID” field and update the UPC.
Note: If this field is greyed out, Amazon won’t allow a direct edit, so you’ll need to use other methods.
Step 5: Click “Save and Finish” to submit your changes.
Method 2: Submit a Seller Support Case to Update UPC
If manually changing the UPC in the product details page isn’t available to you, you’ll need to use other methods, like submitting a Seller Support ticket. In this method, you’ll file a case so Amazon can help you update the UPC on your behalf.
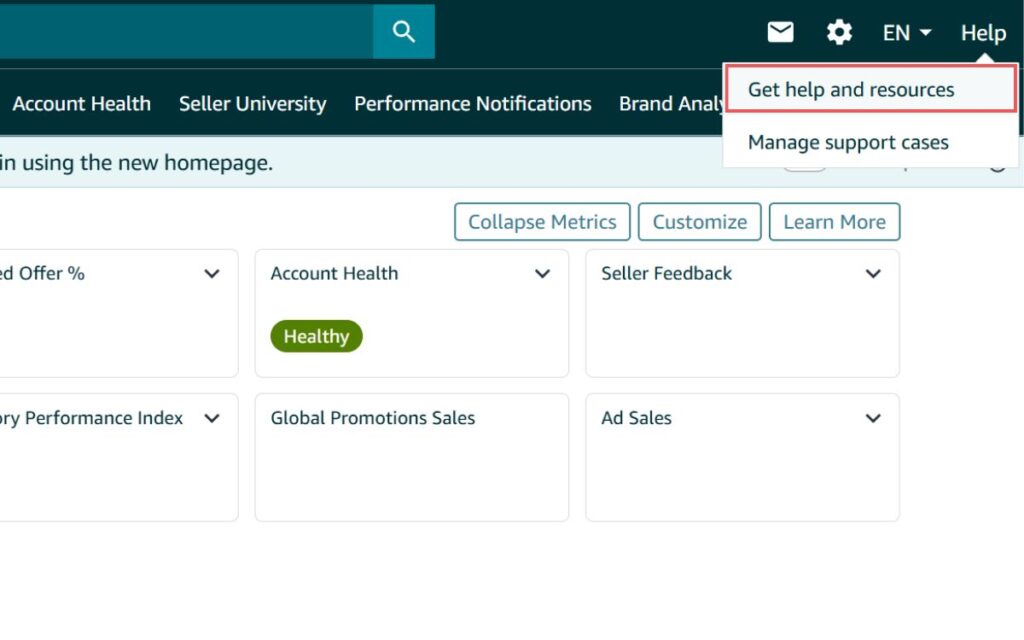
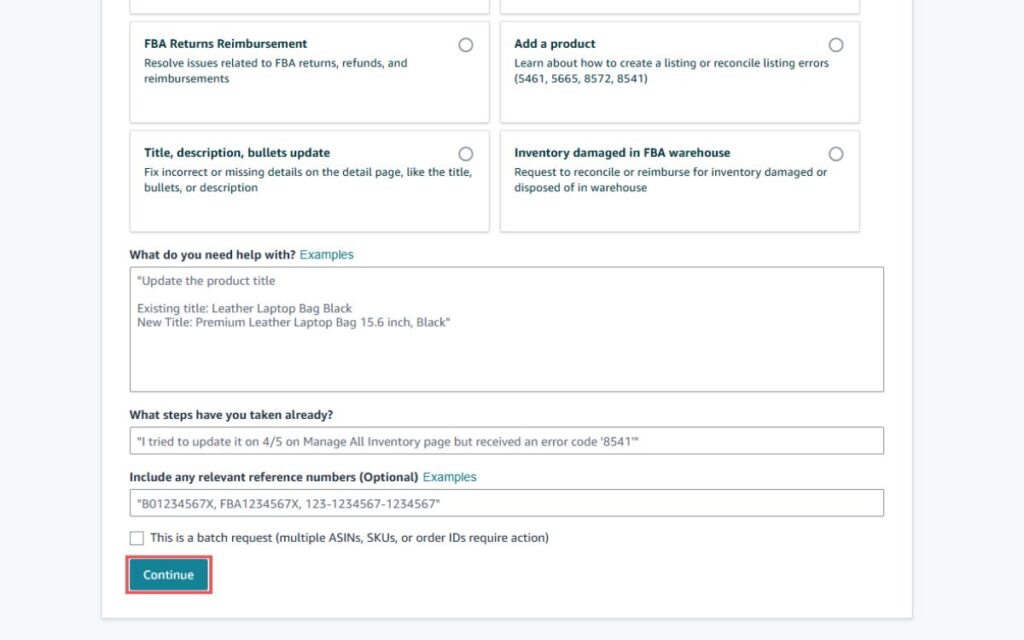
Step 1: Go to Seller Central and click “Get help and resources” at the upper right corner of the screen.
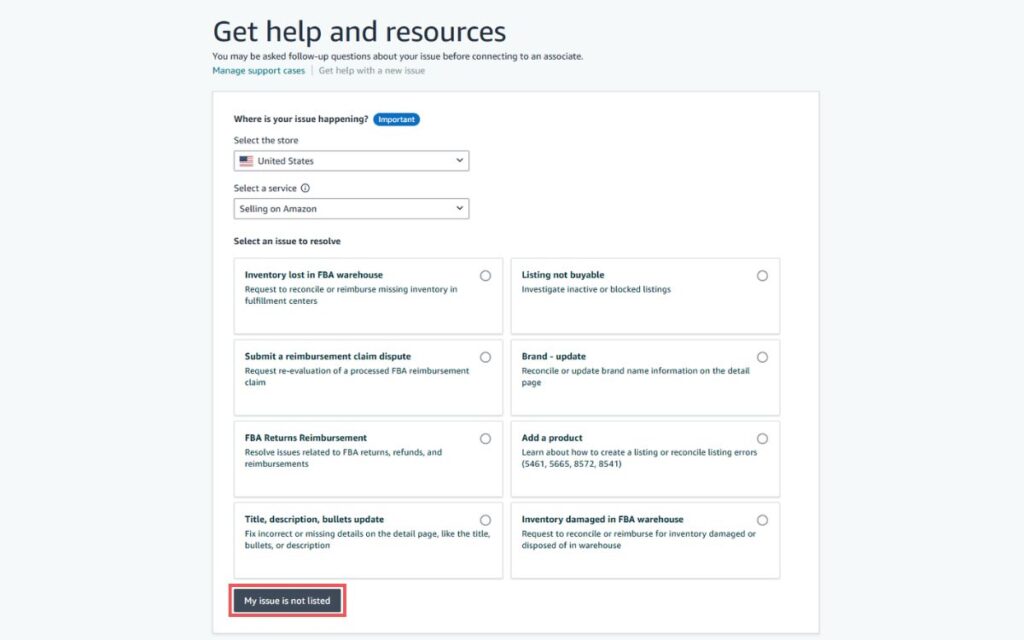
Step 2: Scroll down and select “My issue is not listed”.
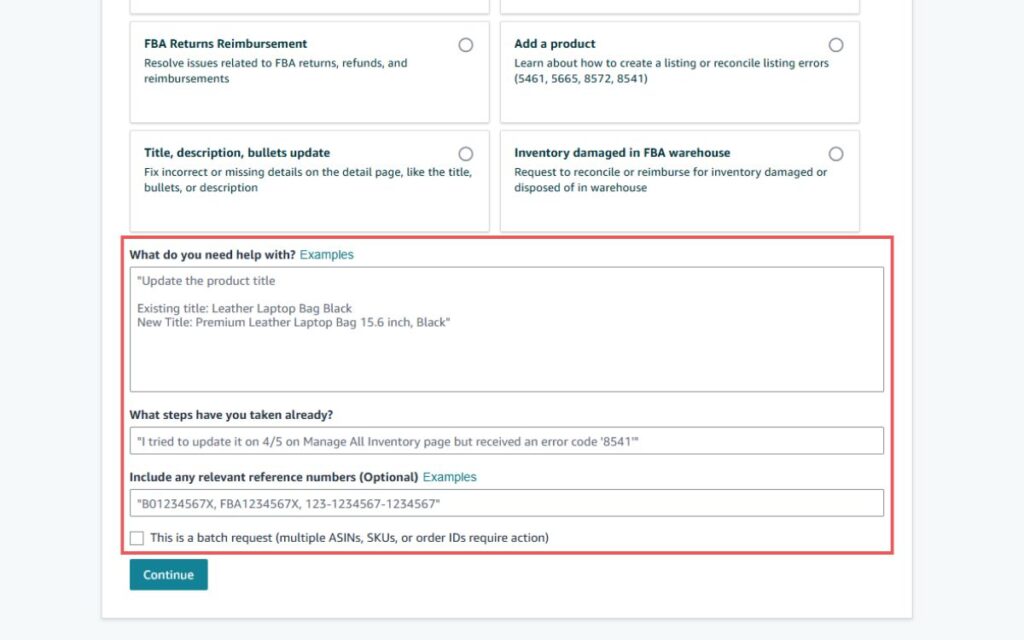
Step 3: In the form, describe your request clearly. Be direct. Include:
- ASIN or SKU
- Existing incorrect UPC
- Correct new UPC
- Reason for the change (e.g., “incorrect UPC was used initially, now replacing with GS1-verified code”)
- GS1 certificate or any supporting documentation, if available
Step 4: Click “Continue” to proceed.
Step 5: Choose your preferred contact method; email or chat is recommended for documentation purposes.
Step 6: Submit the case and wait for Amazon’s response. They may follow up for additional verification, so keep your GS1 documentation ready.
Method 3: Using Brand Registry to Request UPC Changes
Brand Registered sellers have access to a dedicated Brand Registry support team, which allows you to escalate listing issues like UPC corrections when standard Seller Support falls short. If you’re not getting anywhere with regular support, this is your next best move.
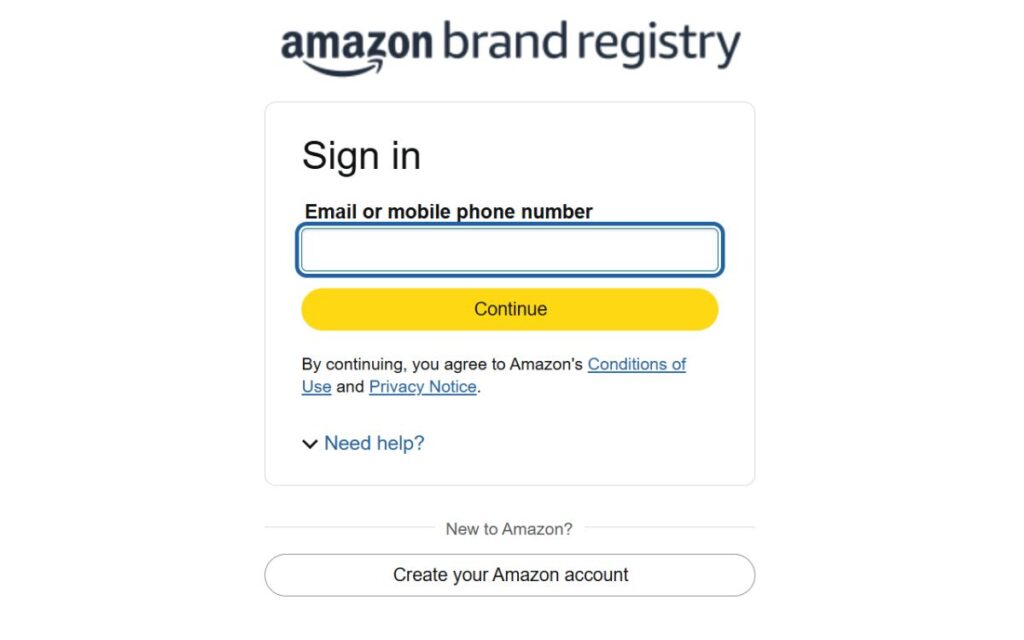
Step 1: Go to the Amazon Brand Registry homepage and sign in with your Seller Central credentials.
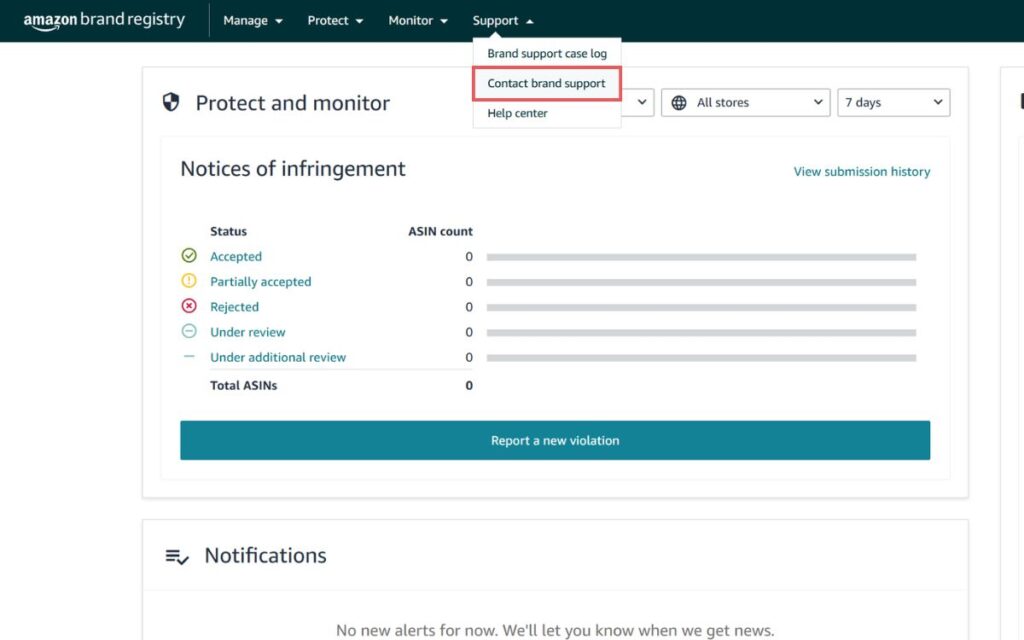
Step 2: Click on “Support” at the top, then select “Contact brand support”.
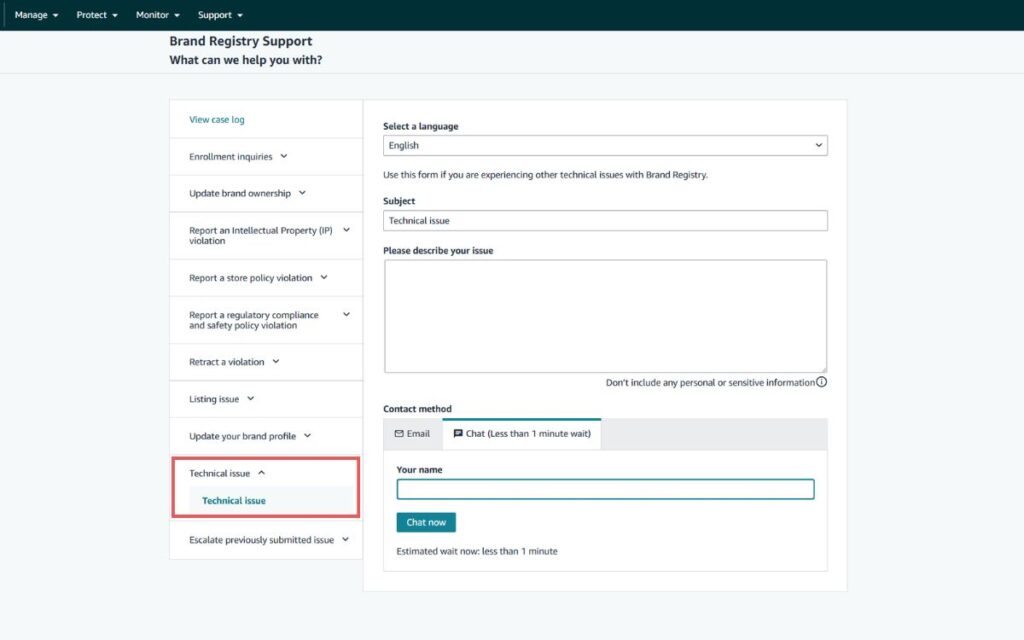
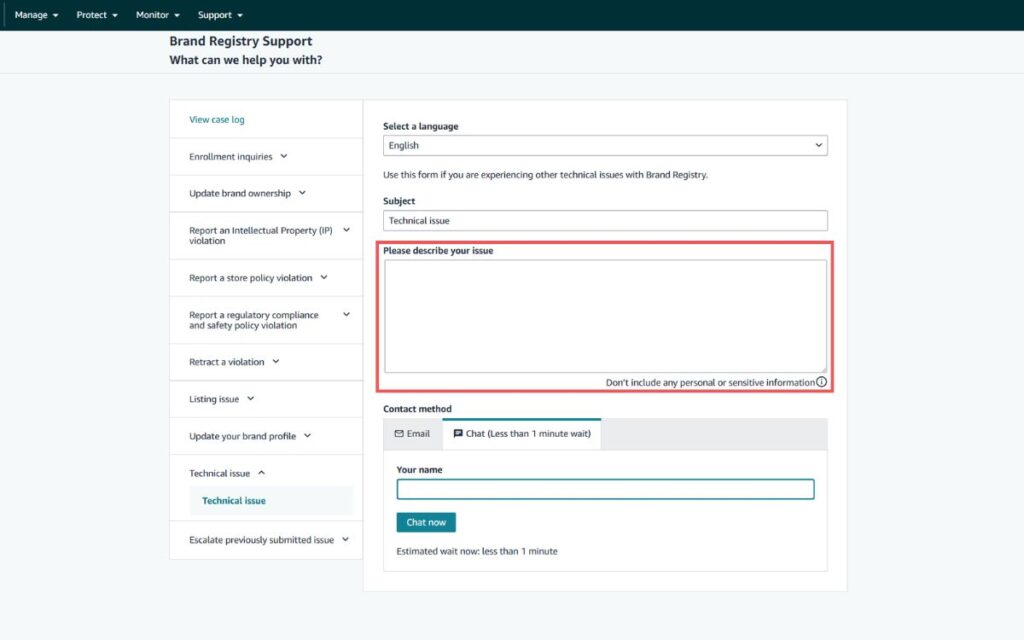
Step 3: Choose “Technical Issue”.
Step 4: In the description box, provide all key details:
- ASIN
- SKU (if relevant)
- Current UPC
- Correct UPC
- Reason for the change
- Mention that you’re the brand owner and can provide supporting documentation.
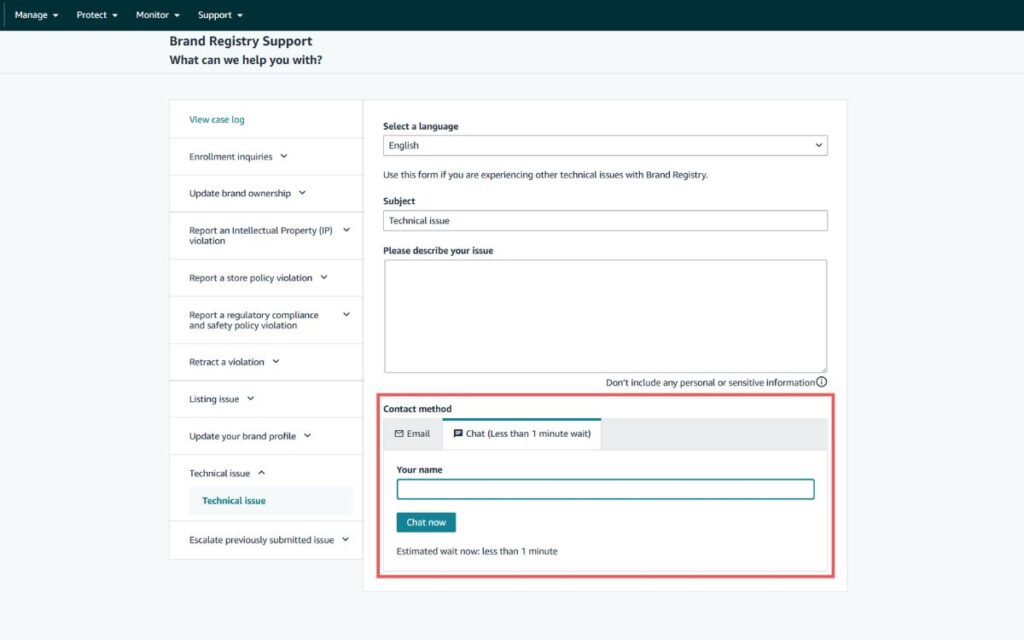
Step 5: Specify the “Contact method”, whether via chat or email.
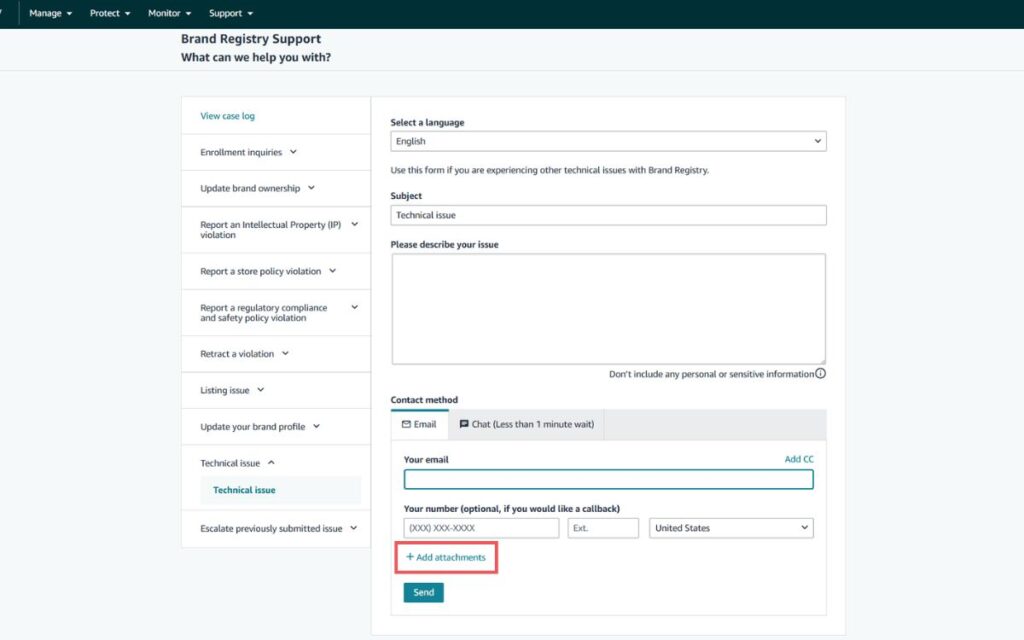
Step 6: Attach your GS1 certificate or any brand ownership documents that prove the UPC belongs to your brand.
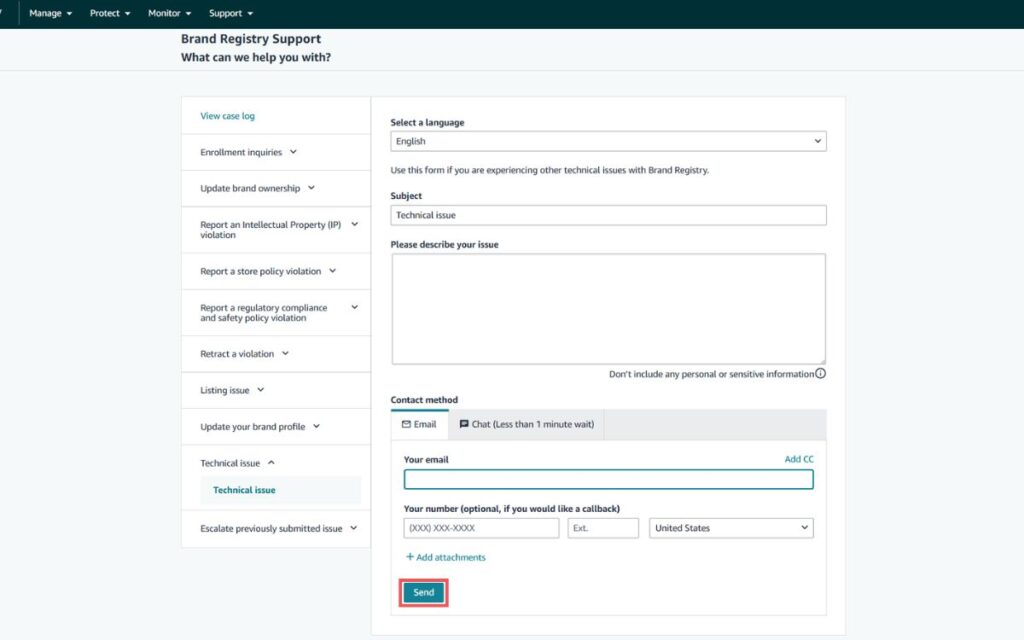
Step 7: Submit the case and monitor your Brand Registry case log or email for follow-up.
Method 4: Creating a New ASIN and Merging to Change UPC Codes
If all else fails, creating a new ASIN with the correct UPC is your last resort to regain full control of your listing. You can then request a merge to transfer reviews and ratings, keeping your product history intact, if Amazon approves.
How to Create a New ASIN
This is your clean slate. You’ll set up a brand-new listing using the proper UPC, as if you’re launching the product for the first time.
Step 1: Go to the “Add a Product” page in Seller Central.
Step 2: Click “I’m adding a product not sold on Amazon”.
Step 3: Select the most relevant category for your item.
Step 4: Enter all required product information, including your new UPC.
Step 5: Click “Save and finish” to create the new ASIN.
How to Merge the New ASIN with the Old One
If both ASINs represent the exact same product and have identical attributes, you can submit a merge request through Seller Central. However, keep in mind that Amazon only approves merges when listings match exactly.
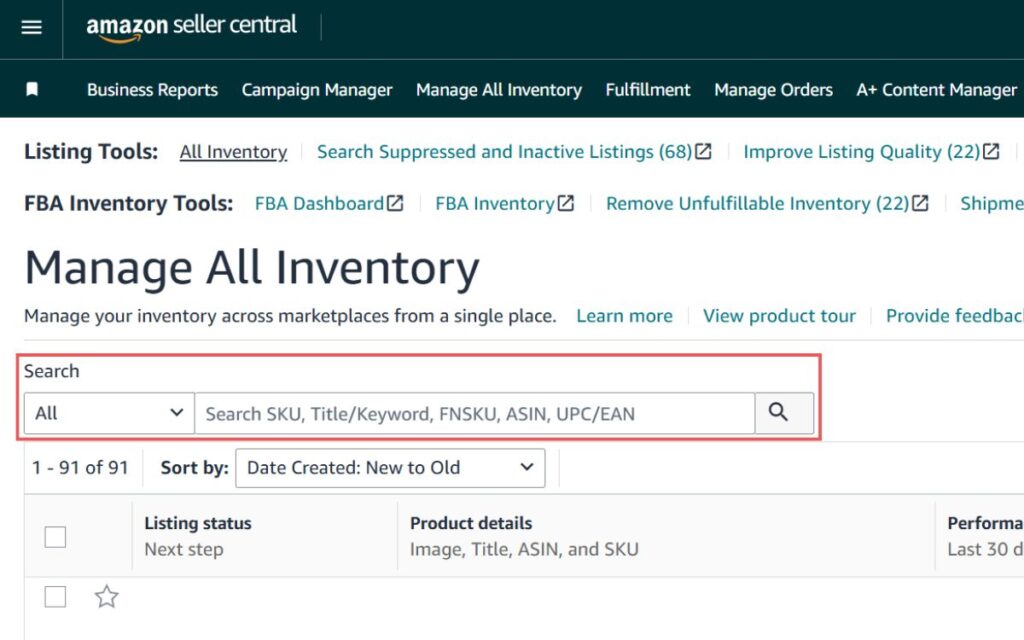
Step 1: Go to “Manage All Inventory” in Seller Central.
Step 2: Search for the old ASIN (the one with the incorrect UPC).
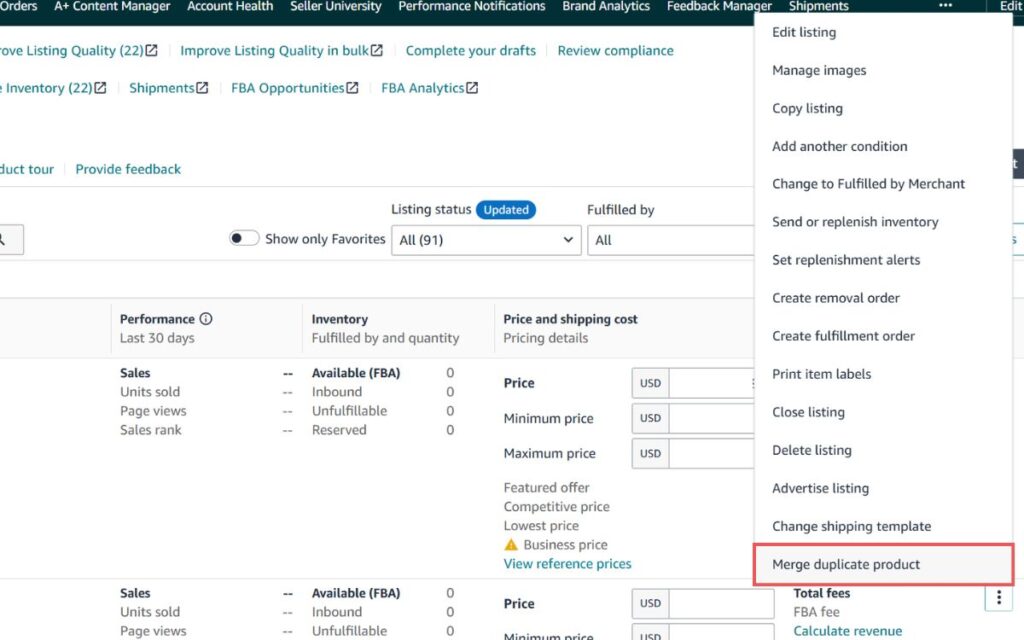
Step 3: Click the dropdown next to the listing, then select “Merge duplicate product”.
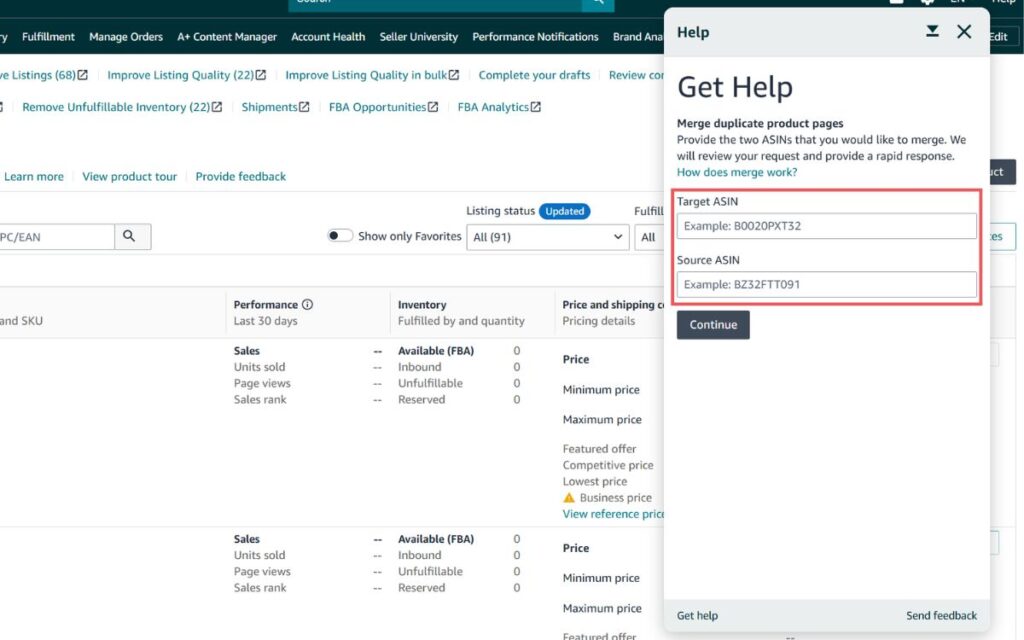
Step 4: In the pop-up:
- Enter the ASIN you want to keep (the new one with the correct UPC) as the Target ASIN.
- Enter the ASIN you want merged/retired (the old one with the wrong UPC) as the Source ASIN.
Step 5: Provide a short explanation and submit the merge request.
Seen a New Seller Central Update? Let Us Know!
Amazon Seller Central constantly updates its interface. If you spot a change we missed, let us know using the form below!
What to Do If Amazon Rejects Your UPC Update?
Amazon might reject your UPC change request, even if you submit everything correctly. When that happens, there are ways to appeal and fix the problem without losing your listing.
- Figure Out Why It Was Rejected
Look closely at the error message or performance notification you received. It will usually mention if the issue is a GS1 mismatch, a duplicate listing, or an invalid product ID; that’s your starting point for fixing it. - Write a Professional Appeal
Keep it short and solution-focused. Use bullet points to clearly explain what happened, what you’re requesting, and avoid blaming Amazon since the goal is resolution, not venting. - Submit Supporting Documents
Amazon often wants proof before approving any change, so include things like your GS1 certificate, product packaging with the correct barcode, or brand authorization documents. If they ask for invoices, send clean, recent ones from a legitimate source. - Use Amazon Brand Registry Tools
If your brand is enrolled, use Brand Registry’s support dashboard to file a case since they typically respond faster and have more authority over listing edits. Make sure you include all details and relevant documentation upfront. - Reach Out to the Page Fix Team
If another seller added incorrect GTIN data that’s now locked in, the Page Fix Team can help clean up or revert the listing. File a case through Seller Central under “Product page issue” and mention that a third-party seller caused the error. - Don’t Spam Appeals
Flooding Seller Support with repeated cases can delay responses or even get your appeal flagged. Give Amazon time to reply before following up, this is usually 24 to 48 hours. - As a Last Resort: Delete and Recreate the Listing
If every other method fails and Amazon won’t update the UPC, deleting the listing and relisting it from scratch with the correct UPC may be your only choice. This resets the product history, so weigh the trade-offs before going down this road.
Tips and Tricks for Changing UPC Codes on Amazon
Changing UPC codes on Amazon involves following specific guidelines and procedures. Using proven tips can help sellers avoid errors and increase the likelihood of a successful update.
- Double-Check Your UPC Accuracy
Before you make any changes, confirm that the UPC matches the exact product it’s tied to. A mismatch, even a small one, can cause listing errors or lead to listing suppression. - Only Use GS1-Certified UPCs
Amazon expects UPCs to come directly from GS1. If you use a cheap third-party UPC, your listing could get flagged or rejected altogether. - Time Your Updates Wisely
Don’t mess with UPCs during peak sales periods. Make changes when your inventory is low or during a restock window to reduce disruption. - Update Listings One at a Time
Go slow. It’s safer to manually update each listing instead of relying on bulk uploads that can introduce errors. - Watch Your Inventory After the Change
Keep an eye on stock levels and sales after making changes. If something breaks or your listing disappears, you’ll want to catch it early. - Communicate Changes Clearly
If your product listing looks different because of a UPC change, let customers know in the bullets or description. You can also follow up with past buyers if needed. - Keep a Paper Trail
Save your GS1 certificate, case logs, screenshots, and anything else related to the change. This makes it easier to defend your listing if Amazon pushes back. - Stay Updated on Amazon’s Rules
Amazon loves to move the goalposts. Regularly check for policy updates related to UPCs so your strategy stays compliant. - Be Persistent, Not Aggressive
If your first request gets denied, tweak your approach and try again. Creative problem-solving and polite communication go a long way with Seller Support. - Ask for Help When You Need It
If you’re stuck, open a case with Amazon or talk to an expert such as an experienced Amazon agency. There’s no shame in getting support when it saves you time and protects your listings.
FAQs About Changing UPC Code on Amazon
How long does it take to change a UPC code on Amazon listings?
If approved, changes usually reflect within 24 to 48 hours. Sometimes it can take longer, depending on the case type and Amazon’s support response time.
Can I reuse UPCs for different products?
No. Amazon does not allow the reuse of UPCs. Each UPC must be unique to a single product.
Should I update my UPCs on Amazon often?
No. You should only update UPCs when absolutely necessary because frequent changes can raise red flags and complicate catalog accuracy.
Know How to Change UPC Code on Amazon the Right Way
There will come a time when you need to update a UPC code on Amazon, whether due to catalog errors, rebranding, or a packaging change. No matter the reason, guessing your way through it can cost you time, sales, and your listing.
This guide is here to make that process less of a headache and more of a step-by-step win. Knowing the right method means fewer delays and faster resolutions.
Having trouble changing the UPC for your Amazon listings? Reach out to our Amazon agency and let our experts help you today.


